Based on ZFS, TrueNAS’s natural unit of data replication is the snapshot. Beyond pure ZFS, though, TrueNAS allows you to schedule snapshots, configure their retention periods, and easily(*) copy them to other systems for offsite backups.
Automatic snapshots
Automatic snapshot configuration can be reached through two paths:
- Datasets ⇒ (select the dataset you want to snapshot) ⇒ Data Protection ⇒ Manage Snapshot Tasks
- Data Protection ⇒ Periodic Snapshot Tasks
To configure new snapshot tasks, I find #1 to be easier; for deleting and changing existing ones, the #2 pathway gives a nicer overview of all the tasks currently configured.
Once you reach it, the snapshot task configuration window asks you all the questions in a straightforward manner:
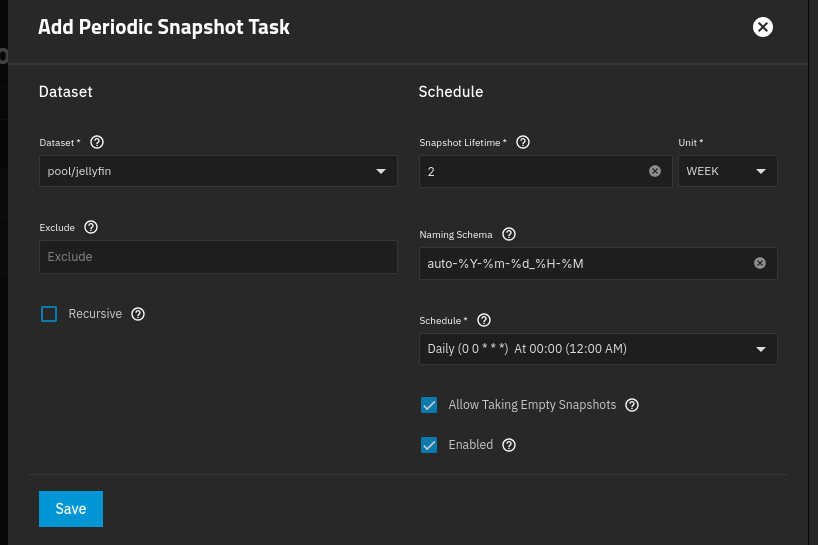
The only thing I prefer to change here is the naming schema. I typically add the frequency and dataset name to the name, for example, this one would become auto-jellyfin-daily-%Y-%m-%d_%H-%M. This makes it easier to identify what dataset and frequency the task is for in a big list of all tasks.
Replication
Replication builds additional protection on top of snapshots by copying those snapshots to another physical host. ZFS snapshot replication is (to my knowledge) a TrueNAS-on-both-ends exclusive feature and is not available if you want to replicate to a non-TrueNAS target. I think the primary means of TrueNAS-to-non-TrueNAS replication is rsync, but I haven’t done this myself.
Backup credentials
For TrueNAS to send data to another host, it needs to be able to authenticate. This is primarily done with SSH.
- Go to Credentials ⇒ Backup Credentials
- Create an SSH keypair if one does not already exist (or a new one if you’re sending data to a new host).
- Create a new SSH Connection:
-
Setup Method: Semi-automatic
-
TrueNAS URL: IP address or reverse proxy URL of the TrueNAS web interface
-
Admin Username:
truenas_admin -
Admin Password: the
truenas_adminaccount password (on the remote end!) -
Username:
root -
Private key: select the private key you created
-
Connect timeout: increase if necessary. I typically use 30sec for an over-VPN connection.
Reusing SSH keys
If you’re creating a new connection for the same remote endpoint that’s just moved IP addresses, you can instead set the Setup Method =
manual, Host = (the new IP address or connection), port 22, usernameroot, and select the private key of your existing keypair. Click “Discover Remote Host Key” and save. This is useful if you’re doing initial “replicate everything” on a local network and then moving the remote to its final resting place. -
Configuring replication
This process details configuring off-site replication to run immediately after a routine snapshot creation task. This takes the scheduling options off the replication task and instead binds the replication to the creation of the snapshot.
Also, this is a PUSH-style replication. TrueNAS supports PULL as well, but I haven’t used it.*
- Configure Automatic snapshots first!
- Go to Data Protection ⇒ Replication Tasks
- Click Add, then Advanced Replication Creation
-
Set a task name
-
Select the SSH Connection: (previously configured connection from Backup credentials)
-
Select the Source dataset on this system
- If you want to back up children datasets too, enable the Recursive option (probably, you will want to mirror the recursive option of the snapshot task)
-
Enable Save Pending Snapshots
-
Select the Destination dataset on the remote system
-
Enable Replication from scratch
Disable this later!
This is a first-run-only setting. Once the remote system has the initial snapshot, you should come back and disable this option to avoid excess data transfers!
-
-
Set the Snapshot Retention Policy ⇒ Same as Source
- Confirm the snapshot lifespan is actually longer than the frequency of snapshots taken — i.e., don’t take weekly snapshots but only keep them for a day!
-
In “Periodic Snapshot Tasks”, select the snapshot tasks you want to replicate to the remote system. I personally prefer to make this relationship one-to-one, but you can select multiple snapshot tasks if you wish.
-
Make sure “Run Automatically” is enabled
-
Make sure “Schedule” is disabled (as instead of a schedule, this is bound to a snapshot task)
-
Example configuration
Here’s an example replication task I use:
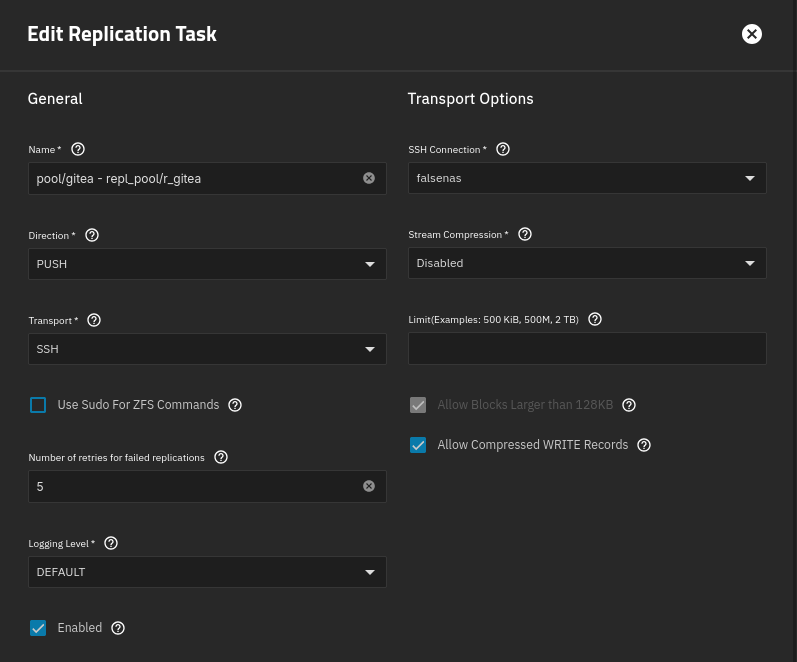
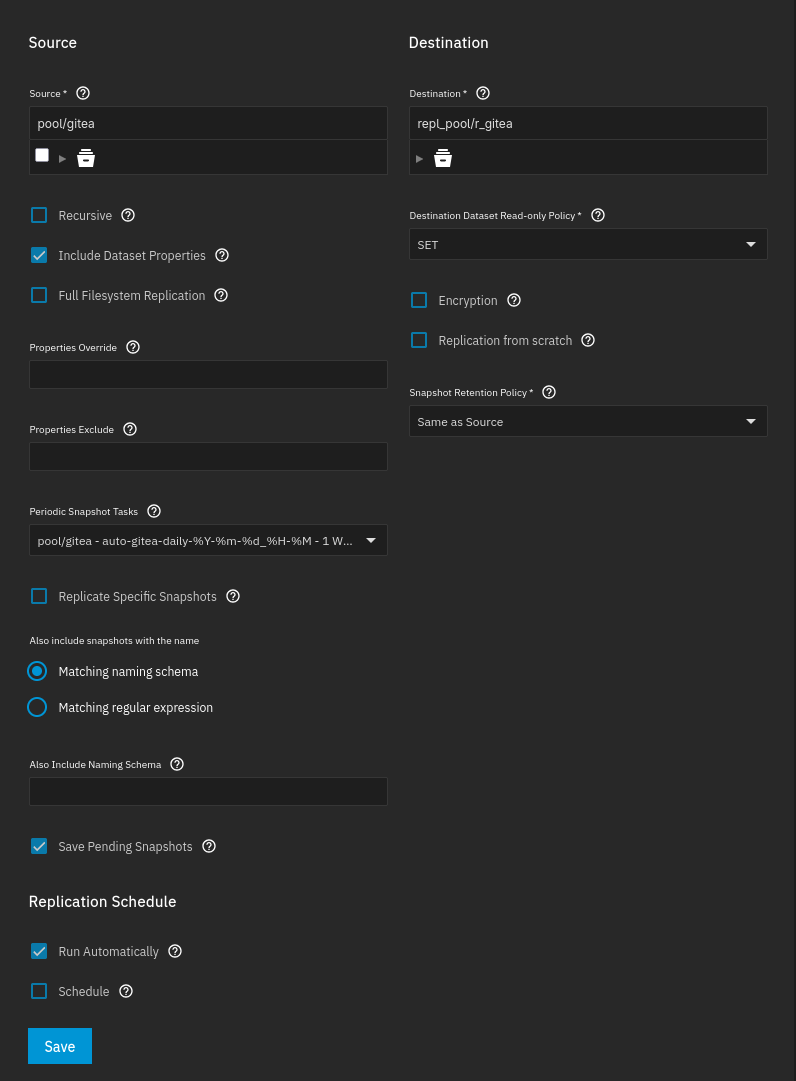
The replication task is now configured and you should see it in the list of replication tasks (probably marked as “PENDING”). You can trigger a run immediately without waiting for the snapshot task to run:
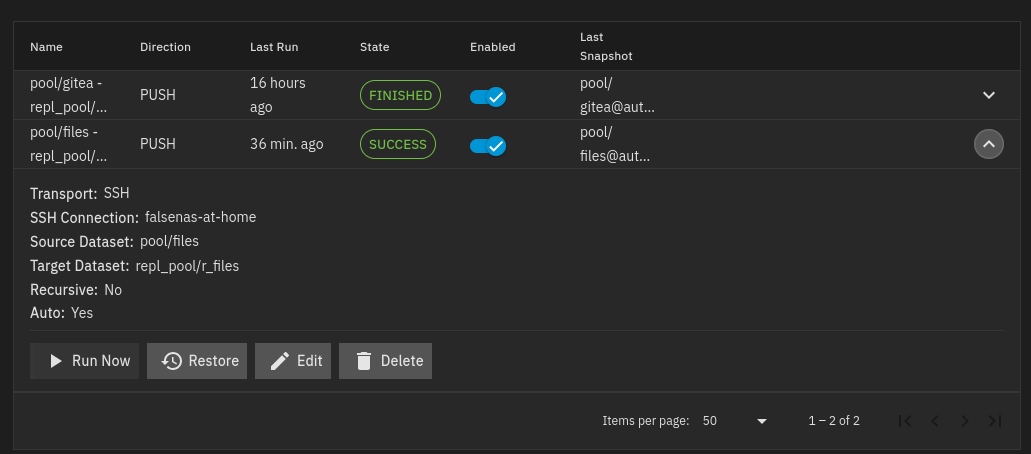
Then, like mentioned in step 3.4 above, make sure you go turn off the “Replicate from scratch” setting!
Other options needed for PUSH replications
If you get errors about
no incremental baserequiring you to re-replicate from scratch, double-check the following options in the replication task:
- Destination snapshot retention policy: Same as source
- Save pending snapshots: Enable
(from https://forums.truenas.com/t/snapshot-replication-issue-no-incremental-base-on-dataset/28644)
You’ll need to rerun the replication job with “Enable replication from scratch” enabled once, then turn it back off.